Downloading and Compiling under Windows
ℹ️ This page describes compiling Arx Libertatis from source under Windows and assumes some familiarity with the command-line. If you just want to play the game, it might be easier to grab a binary release or snapshot if available.
This page documents how to compile Arx Libertatis from https://github.com/arx/ArxLibertatis under Windows.
There are also instructions available for Linux / FreeBSD and macOS
This guide assumes use of Visual Studio 2013, but should also work with any version of Visual Studio. All file paths used here are an example (using C:\Code\Git as a base).
There is a YouTube video that goes through this process in depth: https://www.youtube.com/watch?v=2h9O82Zf3Gk
Step 1: Download Required Applications
- Visual C++ 2013 Express Edition
- Other Visual Studio version should also work.
- CMake
- For CMake installation guide, please visit http://johnlamp.net/cmake-tutorial-1-getting-started.html
- Make sure you add CMake to your system PATH variable so that you can use it from the command line.
- MinGW
- For MinGW installation guide, please visit http://ingar.satgnu.net/devenv/mingw32/base.html.
- In the installer, make sure you check msys-base
- msysgit
Optional Applications
- Optional: TortoiseGit: For better Git GUI.
- Optional: Doxygen: For developer documentation.
- Optional: If you want to use the crash reporter or profiler, you need to download and install Qt5.
- You also need to append the full path to Qt's msvc2013 or msvc2013_64 directory to your
CMAKE_PREFIX_PATH. This directory is in the Qt\[Version number] folder.
- You also need to append the full path to Qt's msvc2013 or msvc2013_64 directory to your
Step 2: Getting the libraries
Getting all libraries to work under Windows required a lot of work and was error prone. Now we provide pre-built versions on the ArxWindows repo (both 32-bit and 64-bit) to simplify the process.
Windows Arx Libertatis depends on the following libraries:
SDL1.2.10 or newer,SDL2 recommended (http://www.libsdl.org/)OpenGL1.5 or newer (http://www.opengl.org/)GLEW1.5.2 or newer (http://glew.sourceforge.net/)OpenAL(OpenAL Soft is strongly recommended1: http://kcat.strangesoft.net/openal.html)zlib(http://zlib.net/)Boost1.48 or newer (headers only 1, http://www.boost.org/)GLM0.9.5.0 or newer (http://glm.g-truc.net/)FreeType2.3.0 or newer (http://www.freetype.org/)
- The ArxWindows repo only contains the Boost source, it doesn't contain any prebuilt libraries - those aren't needed for Arx Libertatis.
- Creative's OpenAL implementation is severely limited, which can cause missing sounds in arx. OAL implementations from IHVs are buggy and the cause of many crash reports.
All of the above can be obtained from the ArxWindows repo.
How to obtain them:
In GitBash
cd /c/Code/git
git clone --depth 1 git://github.com/arx/ArxWindows.git
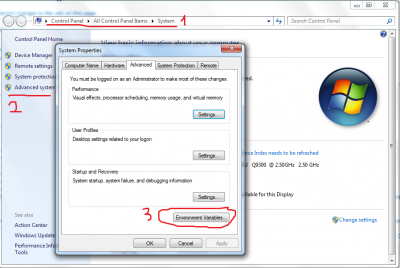
Then we need to tell CMake where to search for our libraries: Add CMAKE_PREFIX_PATH to your environment variable with the following value:
C:\Code\git\ArxWindows\libs\zlib;C:\Code\git\ArxWindows\libs\freetype;C:\Code\git\ArxWindows\libs\openal;C:\Code\git\ArxWindows\libs\boost;C:\Code\git\ArxWindows\libs\glm;C:\Code\git\ArxWindows\libs\opengl;C:\Code\git\ArxWindows\libs\sdl;C:\Code\git\ArxWindows\libs\dbghelp
On Windows 7 or later this can be done here:

After that, you need to start a new prompt (GitBash, Command Prompt, etc) so that the new environment variables are available.
Run the following to check if you set the cmake path correctly or not:
echo $CMAKE_PREFIX_PATH
It should echo:
C:\Code\git\ArxWindows\libs\zlib;C:\Code\git\ArxWindows\libs\freetype;C:\Code\git\ArxWindows\libs\openal;C:\Code\git\ArxWindows\libs\boost;C:\Code\git\ArxWindows\libs\glm;C:\Code\git\ArxWindows\libs\opengl;C:\Code\git\ArxWindows\libs\sdl;C:\Code\git\ArxWindows\libs\dbghelp
Step 3: Getting the source code
There are several methods to get the Arx Libertatis source code - choose the one that suits you best:
Downloading a released version
The easiest way to get the AL source code is to download a versioned release. This will get you a reasonably up to date copy of the source code that has been tested to work.
- Arx Libertatis Source Codearx-libertatis-1.2.tar.xz2.4 MiB
MD5:8e05754b75af0ed7fbf709d30b28df3csignature
Cloning the repository
If you want the absolute latest version of the Arx Libertatis development code and stay up to date, you can clone the AL source code repository. Beware that this will give you the current master development branch that we are actively working on. While the code in that branch should always work, it hasn't undergone any significant testing. If you just want to play the game, consider using a released version instead.
To clone the repository, type:
git clone git://github.com/arx/ArxLibertatis.git
This creates a directory called ArxLibertatis and downloads the current source code from github.
Later if you want to update your local copy of the source code, run
git pull
The git repository does not contain raster images for the icon and logo. These will be generated from scalable versions when building Arx Libertatis, but doing so requires additional dependencies (Inkscape, ImageMagick and OptiPNG). To avoid this, you can instead get the generated images from the ArxLibertatisData repo:
git clone --depth 1 git://github.com/arx/ArxLibertatisData.git
Downloading a snapshot
Alternatively you can download the current snapshot of the source code repository as a .zip or .tar.gz file and extract that:
- Arx Libertatis Development Snapshot (tar.gz)latest snapshot of branch 'master'
- Arx Libertatis Development Snapshot (zip)latest snapshot of branch 'master'
This will give you the same code as cloning the repository, but won't let you update it without downloading everything again.
Step 4: Generating VC++ projects
We'll use CMake for that in GitBash:
mkdir build_vc12
cd build_vc12
cmake .. -G "Visual Studio 12" -DUNITY_BUILD=ON
- "Visual Studio 12" in the command refers to using Visual Studio 2013 to generate the project. If you are using Visual Studio 2012, use ""Visual Studio 11" instead. Use
cmake --helpto check the available compilers on your computer. - -DUNITY_BUILD=ON enables building of each program as one big source file. This is somewhat like link-time optimization but provides faster builds as each header only needs to be parsed once for the whole executable. It also prevents incremental builds - if you plan on using
git bisector trying a lot of small changes, consider leaving it out.
For further build options, please refer to the README file.
Step 5: Building Arx Libertatis
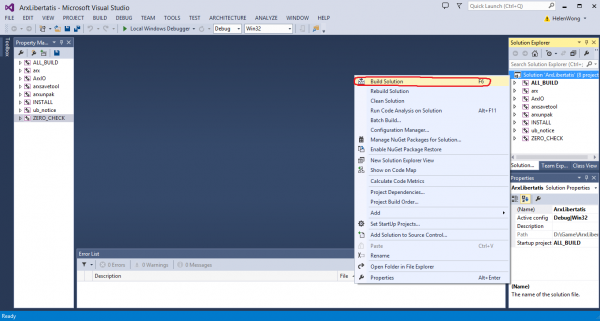
Build the whole solution (ArxLibertatis.sln) in Visual Studio: C:\Code\git\ArxLibertatis\build_vc12\ArxLibertatis.sln as shown in the picture.

You can build the debug target (has debug symbols & can be debugged) or the release target (faster, but currently without debug information)
Step 6: Installing the data files
After getting the game data, you need to put the data files in a location where Arx Libertatis can find them.
By default, Arx Libertatis searches for data files (from the original game) under the following paths:
C:\Code\git\ArxLibertatis\build_vc12<--preferredC:\Code\git\ArxLibertatis\data\coreC:\Users\[YOUR NAME]\Saved Games\Arx Libertatis
Simply place your data files into one of these directories.
- If you want to specify your own data file location, create a Window registry key
HKCU\Software\ArxLibertatis\DataDirwith the value pointing to your game data directory. - Arx Libertatis only needs the following data files:
- data.pak
- data2.pak
- loc.pak
- sfx.pak
- speech.pak
- If you want to specify your own data file location, create a Window registry key
Finally, copy the necessary dlls to C:\Code\git\ArxLibertatis\build_vc12\Debug because that's where your arx.exe is located
C:\Code\git\ArxWindows\libs\sdl\bin\SDL32.dll  \\if you are using 32-bit Windows
C:\Code\git\ArxWindows\libs\sdl\bin\SDL64.dll  \\if you are using 64-bit Windows
The complete search path is described on the Data directories page.
Step 7: Running Arx Libertatis
Simply click on arx.exe under C:\Code\git\ArxLibertatis\build_vc12\Debug or \build_vc12\Release
Step 8: Debugging ArxLibertatis
- Right click on the 'arx' project under the Solution Explorer in Visual Studio 2013
- Select "Set as StartUp Project"
- Change full_screen to false in %USERPROFILE%\Saved Games\Arx Libertatis\cfg.ini, as debugging in fullscreen is a pain.
- Otherwise, you can change to full_screen after you run the game.
- Click the "debug" button (F5) and enjoy :D
- For Arx Libertatis debug explanation, please check out Debugging